This month on The Gentle Side of Infill, we’re walking you through the exact steps we took to build the foundation for the Hazeldean garage suite, each one thoughtfully planned so that it lasts for decades.
Foundation: The Backbone of the Build
The foundation of the suite isn’t glamorous, but it’s the backbone of every durable, comfortable, and energy-efficient infill we construct.
Edmonton’s unique soil conditions and frost cycles mean site prep and proper drainage are crucial from the start. A well-graded lot and correctly set elevation prevents shifting during freeze-thaw cycles and keeps the garden suite aligned and insulated for decades to come.
Our Step-by-Step Foundation Process
Step 1: Excavation
First, we excavated the site to the exact dimensions of the plan. Precision here lays the groundwork for everything that follows. If you dig too deep or too shallow, you’ll end up with foundation issues later, like settling cracks or cold spots. Too steep a driveway slope can make garage access awkward or even unsafe. To combat this, we calibrated the slope and elevation precisely to avoid interior or exterior step issues, which is especially important where the garage meets the living area and the man-door. Final grading was checked over to ensure everything matched the city’s approved grading plan.

Step 2: Cribbing for the Footing
Next, we built wooden cribbing to hold the footing form in place. Cribbing is the mold that ensures the concrete hose pours in exactly the right spot. If the form shifts, the footing can be off-center, which could result in weak spots or misaligned walls. To avoid that, we anchored the cribbing, especially under the garage door entry, to allow concrete to flow cleanly into the right place, with no surprises.
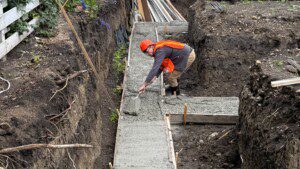
Step 3: Pouring the Footing
After establishing the cribbing, we poured the concrete footing, which supports the weight of the structure above. If the wooden cribbing hasn’t been properly braced, the pressure of the wet concrete can cause it to bulge or collapse, leading to uneven footings. To prevent this, we used strong, well-secured bracing and double-checked all formwork before the pour.
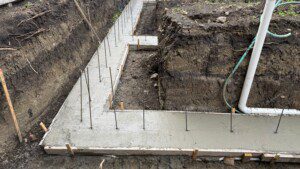
Step 4: Rebar Connection
Steel rebar extends up through the footing into the foundation walls, vertically and horizontally. This ensures the whole structure holds together under stress for decades. Without thorough rebar tying, the walls and footing act like separate pieces, which can lead to separation or cracking under stress.
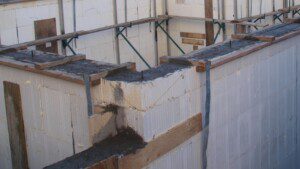
Step 5: Installing the ICF Forms
Before a garden suite comes to life, it starts with ICF (Insulated Concrete Forms) which are stacked to form the walls, then filled with concrete to create a structure that’s strong and energy-efficient. ICF forms must be cut precisely where the man-doors will be, to allow the placement of the doors. The ICF forms also must be cut under the garage door entry so that concrete will be able to flow between the garage slab and driveway.

Step 6: Pouring the Foundation Walls
With the ICF in place, we poured the concrete walls of the foundation. Once cured, they become a seamless, insulated shell for the garden suite. The homeowner will experience a quiet, comfortable space with excellent soundproofing, consistent indoor temperatures, and airtight walls that help keep energy costs low.
What Makes This “Gentle Infill”?
Building in a mature neighbourhood like Hazeldean, we strive to be thoughtful when undertaking a large building project. Here are a few things we do to ensure a better experience for the homeowner and their neighbours:
Tree Preservation Plans: Before we break ground, we identify and salvage healthy trees to avoid unnecessary damage.
Quiet Hours and Equipment Choices: We use low-noise machinery and avoid early morning or late-night work to reduce disruptions to the neighbours.
Clear Site Signage and Safety Fencing: We install temporary fencing and signage early in the project to ensure safety and remove the chance of people or pets accidentally wandering onto the site.
Minimal Disruption to Alleyways and Parking Spaces: We plan deliveries and concrete pours during off-peak hours to avoid blocking residential alleys or parking spaces.
Final Grading That Respects the Block: A newer requirement from the City is that a final lot grading certificate is now mandatory for garden suites. This means that when construction is complete, a surveyor confirms the land slopes correctly so that water drains away from foundations and doesn’t spill onto neighbouring lots. It’s a simple measure that ensures that the drainage will not change in the future and negatively impact the neighbours and the lot where the garden suite is built on.
What’s Next for the Hazeldean Garage Suite
With the foundation set, we’re ready to frame the suite. In the next blog, we’ll take you through the framing phase so you can see the design come to life!
In the meantime, if you’re considering a garden suite of your own, or are interested to learn more about what’s involved, please reach out to us at info@eehomes.ca or 780-708-4660.
For more insights on thoughtful, energy-efficient infill, follow us on LinkedIn, we regularly share Edmonton’s bylaw updates, project stories, and behind-the-scenes perspectives from the Energy Efficient Homes team.
About Energy Efficient Homes
At Energy Efficient Homes, we believe infill should feel good, for your family, your neighbours, and the neighbourhood as a whole. Every project is rooted in collaboration, designed with care, and built to support a more livable, walkable Edmonton.
If you’re interested in building a garden suite for your backyard, please reach out!